
Buried somewhere in what follows is a review of Steve’s DX10
Fixer. But Steve’s DX10 Fixer (henceforth referred to here as
simply “the Fixer”) is an unusual product — and so this has to
be an unusual review, too. I can’t, for example, show you
side-by-side screenshots of DX9 and then DX10 views in fsx,
since reducing the pics to the resolution needed for inclusion
here will remove the detail which you would need to see.
Furthermore, I will also need to explain quite a lot of the
background, so that you can understand exactly what the Fixer is
doing.
For these reasons what follows will necessarily be somewhat
heavy on explanatory text, but you do need to be aware from the
very beginning that the Fixer is not the sort of product where
you simply run an automated install and that’s it: yes, there is
an automated installer, but you need to know more, and to do
more — hence the need for the following explanations (which will
also include the stuff that I wish I had been able to read
before I installed the Fixer, incidentally).
But first, to save you the possible frustration of reading
through all this only to discover that for one reason or another
you are not a potential customer for the Fixer, here is a very
brief summary of what I consider to be the essential things
which you need to have, and to be aware of, before you can run
it — the explanations of what lies behind these items will be
found in the rest of the review.
1. You obviously need a DX10-compatible graphics card. (DX-11
compatible is fine too, as I’ll explain very soon). However,
since in DX10 mode
the rendering pipeline is no longer
shared by the CPU (the GPU does it all) I would therefore
suggest that you ideally need to have a high-end
graphics card. I’m tempted to also say that
it may be better to have an Nvidia card than an ATI card — even
though many ATI owners do use
the Fixer, too.
2. Apparently, you can’t have multiple monitors
on multiple
graphics cards. (My three work fine on one card). I suspect that
this is a DX10
limitation, rather than a Fixer limitation.
3. A version of Windows with support for DirectX 10 (i.e.
Vista, 7, or 8 — but not XP).
4. An FSX installation which is capable of running in DX10
preview mode. This usually means that you have Acceleration
installed as well,
but once again you will find the rationale
below.
5. You will need the willingness to spend a little time
experimenting, tweaking, and tuning your configuration to derive
the optimum benefit
from the Fixer. If you hate the idea of
groping around in FSX’s internals and you’re not even sure where
to find your fsx.cfg file, perhaps
you should look elsewhere (or
phone a friend).
6. If, on the other hand, you are someone who is already
heavily into the business of tweaking, and you have installed
across-the-board shader
modifications such as the ENB Mod,
Shade, SweetFX, or even some of Steve’s previously-issued free
individual fixes, then you may need to
take care. I don’t use
such esoteric things myself, so all I can suggest is that you
find and follow the most current (at the present rate of
DX10
progress anything more than a couple of months’ old is probably
out of date) advice you can find. For what it’s worth, my
understanding at the time of writing is that Shade and SweetFX
will work, but that the ENB series mod was apparently coded for
DX9,
so that having its d3d9.dll in the fsx directory will cause
a crash in DX10 mode. Also, FYI, SweetFX might require you to
add the full fsx
directory path to your
#include statement for SweetFX_settings.txt.
So allow me, therefore, to begin by explaining a few essential
terms (if you are already aware of this stuff, then please feel
free to skip ahead), also mentioning a little of the relevant
simming history.
DirectX or DX — what is it and where is it?
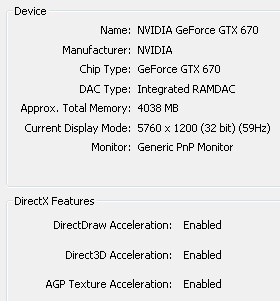
DirectX incorporates elements such as DirectDraw Acceleration,
Direct3D Acceleration, and AGP Texture Acceleration which allow
your applications (such as fsx) to use the hardware acceleration
provided by your video card. (DirectX also incorporates
DirectPlay and DirectSound which interface with your sound
card). Every version of Windows from Windows 98 onwards includes
DirectX, so hopefully you shouldn’t have to do anything special
to get it. Windows XP SP2 introduced DirectX 9.0c, which is
probably the first version that most of us used with our
graphics hardware.
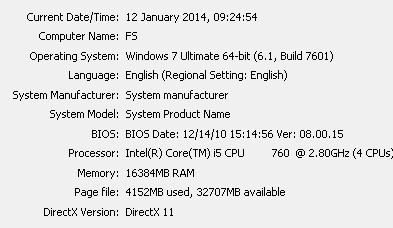
However, when Vista came along, it incorporated DirectX 10, too
— whilst Windows 7 also added DirectX 11. If you want to check
what you have installed, click on the Start Orb (or open a
command box) and type dxdiag to run dxdiag.exe. You then get
several screens of information — here are a couple of extracts:
 |
 |
Or if you wish, you can opt to dump the diagnostic information to a text file: here is a very short extract:
|
Memory: Available OS Memory: Page File: Windows Dir: DirectX Version: |
16384MB RAM 16382MB RAM 4210MB used, 32649MB available C:\Windows DirectX 11 |
Notice that in both cases the version number is shown simply as DirectX 11 — this does not mean that DX9 and DX10 are not installed, simply that DX11 is the latest version present. If on the basis of this test you discover that you need to install the latest DirectX, please visit //support.microsoft.com/kb/179113
(Incidentally, for the benefit of those interested in Microsoft trivia — the X in Xbox was meant to indicate that it incorporated DirectX technology).
Which versions of Microsoft Flight Simulator can run DX10?
The first Microsoft Flight Simulator was heavily based on the Bruce Artwick (BAO, later subLOGIC) flight simulator, so that in 1982 version 1.0 of the series was released, partly as an inducement to buy the first graphics card for the newly-released IBM Personal Computer (I fell for it, even though I was already running Artwick's sim on the Apple ][). But new versions of FSX kept being released....
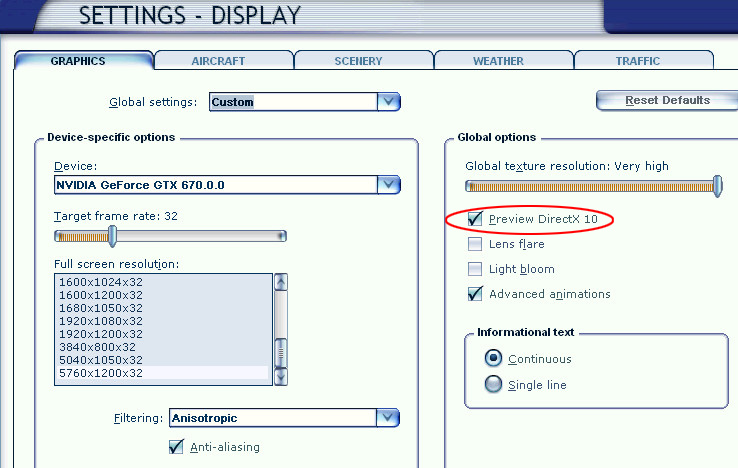 |
After a further ten versions, FSX was released in 2006, duly followed by Service Packs 1 and 2. Then, in late 2007, the “Acceleration” expansion pack was introduced (which automatically installs SP1 and SP2 if required, so forget the Service Packs if you install Acceleration after installing FSX). More to the point, as far as this review is concerned, was that Acceleration enabled those who had a DX10-compatible graphics card to discover a box on the Graphics Settings page which, when checked, enabled "Preview DirectX 10" mode (ringed in the picture: if you don’t see that checkbox, you can’t run FSX in DX10 mode). |
So this is where our story really begins.
What’s wrong with the DX10 Preview as it stands?
Well, as its name suggests, on release it was only a partial preview of the full DX10 mode, which was then rescheduled to make its full appearance in FS version XI (i.e. the version which never came). Rumour hath it that commercial pressures necessitated the release of FSX whilst DX10 was still incomplete and being worked on, but because at that stage it was also too late to take it out again, it was hastily renamed as a Preview. (In a way, the success of the Fixer lends support to that view).
Owners of DX10-compatible graphics cards who tried the DX10 Preview mode, however, reported a whole range of problems with it, mostly relating to textures of both aircraft and scenery. The affected textures suffered from a range of visually unpleasant ills: they either appeared wrongly, or perhaps flickered, or were simply not seen at all so that the object was black. In the case of bridges and older aircraft they vanished altogether between dusk and dawn, whilst older legacy scenery, that uses the FS8 (!) BGL format rather than the XML BGL format introduced for FS9 and FSX, appeared grey during those times. In the early days, after switching to DX10 mode and seeing those sorts of results, most people switched straight back to DX9 and never thought any more about DX10.
Except for one man, whose name is Steve Parsons…..
As Steve says in his blog ( http://stevesfsxanalysis.wordpress.com/ )
| “I started by wondering if I created two objects ‘near’ to each
other should I try and use the same texture sheet and set
drawcalls or LOD as an option. The answer would appear to be
that it depends if they are in the same 1km tile! I then asked myself the question – ‘Why do runways flash in DX10?’ It turned out that the question I should have asked was ‘Why don’t runways flash in DX9?’” |
OK, so what is Steve’s DX10 Fixer? And why use it?
What the Fixer aims to do is fairly amazing, and most people had quite simply assumed that to do it was impossible. The name says it all, really — the Fixer sets out to fix as many as possible of the unpleasant effects associated with the use of the (unfinished, a.k.a. “preview”) DX10 mode in FSX. There remain a few minor issues that Steve is still working on —and indeed he maintains that there are one or two issues which may never be fixable — but gradually as the various Fixer versions have continued to arrive (this review is based on v1.3, build 34) we have reached the point where I haven’t encountered a problem for some time (although I don’t use very old scenery or aircraft, which probably helps). So I don’t expect to ever return to using DX9.
But the big question is, of course, why bother? DX9 mode works across the board — it ain’t bust, so why write a Fixer to fix it?
No doubt different people would answer that question differently, so all I can offer you is my own rationale.
The huge advantage of using FSX is that we have benefited from the fact that there was no FS XI. By that I mean that we have now enjoyed eight years of uninterrupted development which has enabled the developers to fully explore and utilise all the gorgeous visual delights in FSX, without being distracted by the need to break off and start to develop for a new version. OK, P3D does sort of count as a new version, but unless you take the PMDG route and actively prevent your aircraft from being ported to P3D they will probably work quite well there. Furthermore, improvements in computer hardware over those years, notably in CPU speed which is so essential for FSX, have meant that most of us are seeing FSX running better than was considered possible at release time. Added to which, efforts by many dedicated simmers have resulted in a hugely improved understanding of how FSX works, and hence an understanding of how to tune its performance by tweaking the fsx.cfg file.
 |
If there is any downside to taking advantage of the huge amount of FSX development that is available to us, it’s that we can’t resist (OK — I can’t resist, anyway) packing our FSX world with all sorts of add-on goodies. So alongside FSX I am running AI Traffic, global Orbx FTXG and Vector scenery, global mesh, ASN weather injection (with AS2012 textures), Aivlasoft EFB, FSUIPC, Radar Contact v4.3 for ATC, TrackIR5, EZCA, LINDA, GSX, and no doubt many others that I can’t think of at present. Not to mention some very demanding airports, and even more demanding PMDG aircraft. However, as we all know, in this world there’s a price tag on everything....
Even after eight years, FSX can still soak up far more hardware performance than can be satisfied by modern PCs. So if, like me, you are running a ton of add-ons alongside your FSX, then you will be subjecting your hardware to a lot of strain, and that in turn will limit how far to the right you can place your sliders, as well as what you stipulate for some very significant fsx.cfg settings such as LOD_RADIUS. It is therefore hardly surprising that as time has gone by more and more simmers are starting to encounter OOM errors as they run out of Virtual Address Space (VAS): they have probably been nearer to the borderline than they realised for some time, and the latest irresistible add-on that they have installed has finally tipped them over the edge.
Here’s the thing: DX10 mode is not merely a modification of DX9, it’s a completely different animal. Perhaps the most obvious difference lies in the way in which the graphics information is processed. With DX9, graphics handling is shared between the CPU (think i5, i7, or whatever) and the Graphics Processing Unit (GPU) on your graphics card. In DX10, on the other hand, the GPU handles the graphics all on its own. There are two very obvious and immediate consequences of this:
a) Some of the load is removed from the CPU, so you may get more frames per second. Some people benefit more than others, but
nonetheless performance should potentially improve.
b) Because the GPU now handles the graphics natively, this also frees up some memory that was previously used to map the data into the
GPU’s RAM. In simple terms, your VAS usage declines, perhaps dramatically (though this may depend on the amount of memory on your
video card).
As I said, everyone’s experience of the advantages seems to be different — probably depending on how they have tuned their FSX installation, as well as the balance between their CPU-power and their GPU-power. To exemplify what I mean by balance: in simple terms, whacking a 780 card into a machine where the CPU can only manage 2.8 GHz or so is going to be a waste of money — you’ll not see the real benefit of that huge investment in graphics technology unless you have a CPU running at 4.5 to 5 GHz. (IMHO, YMMV, caveat emptor, etc. etc.).
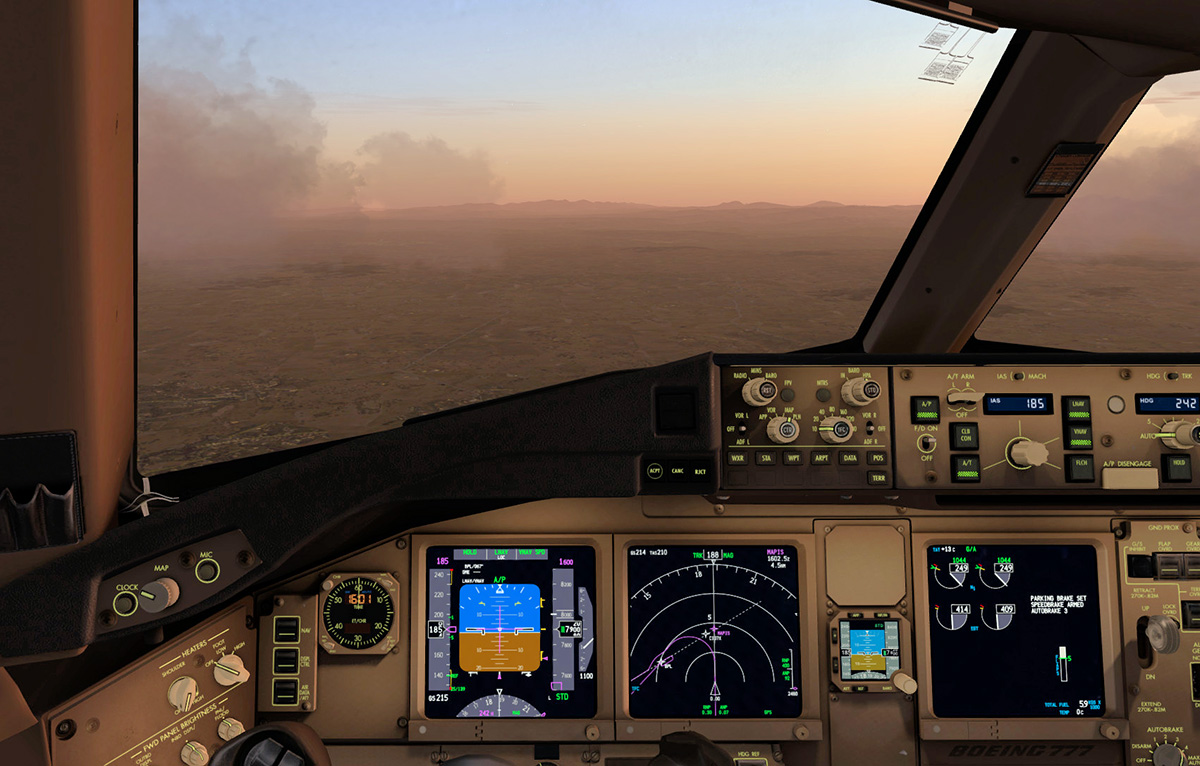
But let’s consider an example machine: mine. I’m running an i5 760 overclocked to 4GHz (beyond that point the heat and the voltage both started to escalate dramatically) alongside a factory-overclocked Nvidia GeForce GTX 670 card. Immediately after implementing DX10 I found that my frames per second (fps) increased slightly, but only by around 3 - 5 fps. My VAS usage, however, dropped by getting on for 1Gb, so that I went from needing to think about what airports I landed at (DX9 VAS generally reaches its maximum when you touch down at your destination airport, only increasing beyond that if you summon deboarding from GSX) to being able to fly long haul trips for hours in my PMDG 777 into the most demanding airports in the world with no problems at all.
The experience of some other people, though, is different, in that they see a significant increase in fps, but a less dramatic reduction in VAS usage. As I said, it all depends....
(Incidentally, based on my own experience, the way in which VAS is used in DX10 has changed, too. In DX9, typically the usage would inexorably increase and increase — OK, it might drop slightly occasionally, but mostly it just kept on growing. In DX10, my VAS usage bobs about all over the place, and often resizes itself downwards by large amounts in a couple of seconds, which is good to see. But I haven’t seen anyone else mention this, so let’s keep it between ourselves, for now).
Anyway: the bottom line is that for me the performance increase in terms of fps was sufficient to allow me to tweak some other settings such as LOD_RADIUS to achieve significant improvements in what I see onscreen, so I’m an extremely happy bunny: my FSX has never looked so good, and hasn’t run out of VAS no matter how hard I tried to make it do so. (Can you take the PMDG 777 out of Orbx’s Southampton airport and land it at one of the advanced renditions of Heathrow, whilst using Orbx England and detailed mesh? I can (now) — but I certainly wouldn’t care to try that in DX9....).
But I’m never going back to DX9, anyway.
Operational details
Hopefully, I have now said enough about the Fixer to make the potential benefits clear. So let me move on and describe the installation process; and soon I’ll also explain how to go about switching between DX9 mode and DX10 mode (since you’ll want to do that at first, to make comparisons).
Installing the Fixer
Having first of all made sure that your FSX can run in DX10 mode, you then need to get on to the FlightSim Store site (http://www.flightsimstore.com/product_info.php?products_id=2630 )
You now need to install the Fixer. But here, I’m afraid, you immediately encounter a snag, since no instructions come with it. There is a manual that describes the installation process, but that manual isn’t installed until after you have installed the Fixer — definitely Catch-22! Which is why I am (unusually, in my reviews) including details of the installation here. Please don’t start the installation just yet, though — you have a couple of other essential things to do, first.
The first thing to do is to make backup copies of your fsx.cfg (DX9 mode) and, if you have Nvidia Inspector settings (or the ATI equivalent thereof), back those up, too (click the Export icon in Inspector). Label them in their filename as DX9 so you know which is which (you’ll have their DX10 equivalents as well, soon). In fact if you’re as paranoid as I am (after a lifetime in the software business) you may want to copy away all your basic FSX configuration files, just to be on the safe side. (Start by Looking in C:\Users\your username\AppData\Roaming\Microsoft\FSX).
Also, it would be sensible to ensure that you have checked and followed the most recent advice concerning any shader mods and so on, if you have installed any. I mentioned above that ENB Series is apparently DX9 only and so won’t work in DX10, but if you have SweetFX, Shade, or Steve’s old free fixes then you will need to check the most recent applicable advice. Although if you’re sufficiently advanced in FSX tweaking to have installed such things, you probably don’t need me to remind you to do that.
We’re nearly ready now, but before you start to install the Fixer, check your emails and make sure that you have your Order Number, Order Date, and Registration Key to hand. This is one of those wrapper installs whereby you need to enter that information before the installation can begin, by selecting Online Validation and then entering the information when it is requested.
The Fixer will suggest installing itself to C:\Program Files (x86)\DX10SceneryFixer, and I would strongly recommend that you go along with that — and, in particular, be sure not to install it into your FSX folder. (There used to be a bug that deleted your FSX directory when installing a new version of the Fixer if you had done that, so I’m not taking any chances....). I’ll also add some instructions for reinstalling a new version of the Fixer towards the end of the review, since I’m afraid that in that eventuality you first of all have to uninstall the old one .... <sigh>
Next, you will get a screen about Microsoft Visual C++ 2010 x86 Redistributable Maintenance. Don’t worry, this is perfectly normal, so simply elect to repair your installation, and it will probably exit immediately because what is needed is already installed. OK, the wrapper has now finished processing, so click Finish to close the wizard.
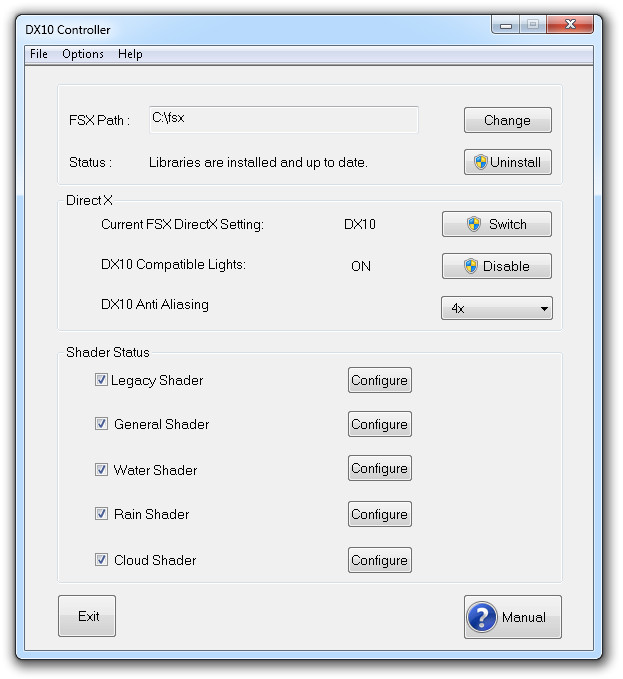
The installation process will have installed an orange icon on the desktop for you, so you can click it to start the DX10 Controller, which is your control panel for the Fixer’s DX9/DX10 setup and configuration. (You can’t make any changes here while FSX is running, incidentally).
The first essential task is to set the correct path to your FSX base folder: click Change and select it from the popup browser that appears. You will then see that the current status says "WARNING!! Libraries are not installed", so double-check that you have taken the appropriate action for any previous shader mods and so on, and then click the button. The status now reads “Libraries are installed and up to date”.
| At this point you have some serious reading to do:
I would suggest that you click on the large button, lower right, which summons the pdf manual, and take a preliminary scan through it so that you have a rough idea what you have just bought. Once you have familiarised yourself with the Fixer as a whole, then use the manual to guide you through switching to DX10 mode (which should be as simple as clicking the button marked “Switch”), and then configure all the various options which are available to you. Once you have done that, the DX10 Controller will look something like this the picture on the right: |
 |
You now have your FSX installation in DX10 mode, but we haven’t finished yet — you have two more important things to do. The first is to save your fsx.cfg again (the Fixer will have modified it) — this time, be sure to save it with a name which clearly identifies it as the DX10 version. The other is to save your Nvidia Inspector settings too, so I guess I need to say something about those now.
Just before doing so, though, my apologies to those with ATI cards, but since I no longer have one I can’t help you. However, this is probably a good time to mention some excellent Internet sources of help with the Fixer, including the necessary help for ATI users.
Internet sources of information
First of all, we have this link, which (as its name tells you) is “the official DX10 scenery Fixer support forum” —
http://forum.avsim.net/forum/644-the-official-dx10-scenery-fixer-support-forum/
That’s the first place to look for information, including a pinned notification about the current version of the Fixer (there is unfortunately no automatic mechanism for informing you when a new version is released). We also have —
http://forum.avsim.net/forum/569-dx-10-discussions-hints-and-help/
Again, the name says it all. One thing that you need to be aware of is a pinned item at the top of the forum: the “How To” document by Paul J. It is well worth while opening that thread, because in it Paul (a real DX10 hero) gives you download links not only for the “How To” document, but also other very useful stuff, including, in his signature, a pointer to this thread for ATI users, called “DX10 Fixer - ATI/AMD AA and Vsync
Guide” —
http://forum.avsim.net/topic/421849-dx10-fixer-atiamd-aa-and-vsync-guide/
//dl.dropboxusercontent.com/u/52676345/DX10_Fix/Notes/AMD%20HD%207000%20Anti%20Aliasing%20Summary.pdf
Finally, if you have access to the Orbx forums then you may find some helpful posts here —
http://www.orbxsystems.com/forum/forum/171-dx10-discussion/
Obviously, that forum deals with DX10 in general rather than the Fixer in particular, but you may nonetheless find some useful information in there.
(I gave you the link to Steve’s blog earlier in the review, but the above forums are generally more informative).
Nvidia Inspector settings for DX10
(Apologies to ATI users, but hopefully your needs will be met from the links I included above: please skip to “Mode switching”, below).
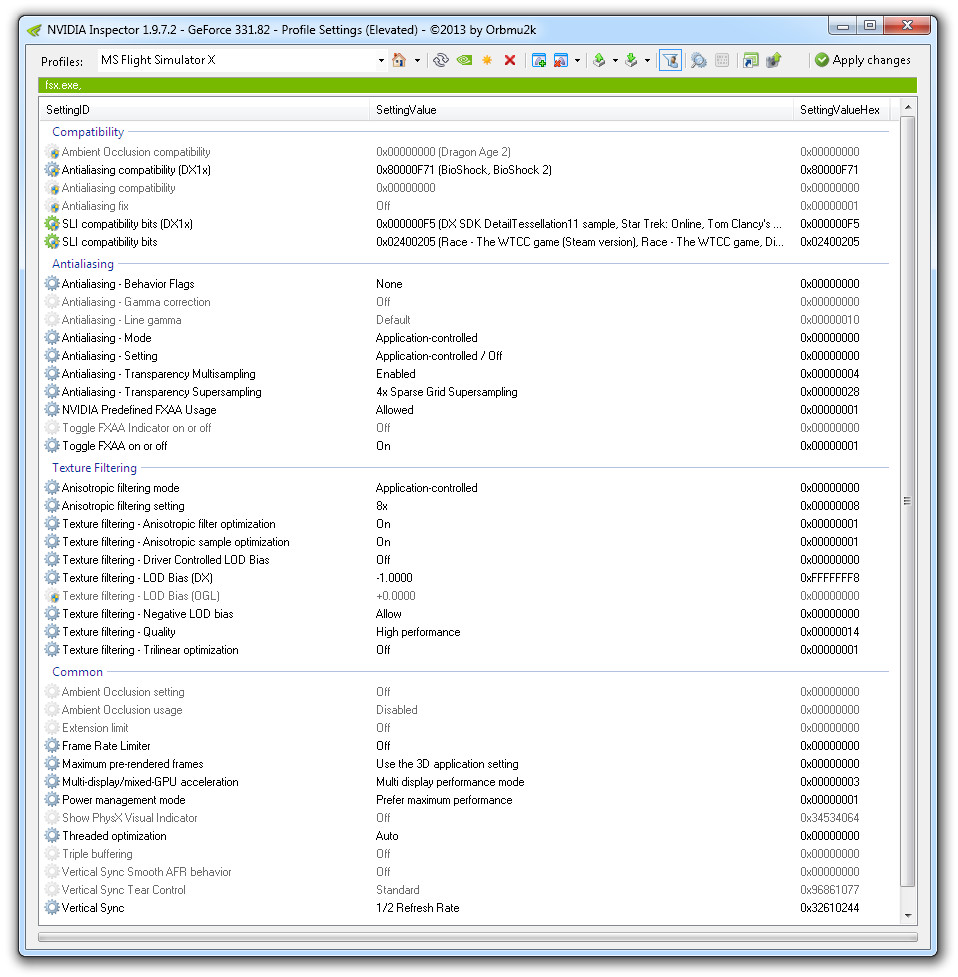
This is not the place to cover downloading, installing, and configuring the Nvidia Inspector, since otherwise this document will become even longer. There are many sources of information concerning the Inspector online, so do please refer to them. I will therefore assume that you know (or can discover) how to use Inspector to modify its “MS Flight Simulator X” profile (that’s the one you have to find and use — overtype the initially-displayed profile name with MS and then select “MS Flight Simulator X” from the small list shown) and apply it to your fsx.exe; and also that it helps to click the “funnel” icon so you can view just the custom settings that you need to change.
This whole area of Inspector settings for DX10 is fairly complex, and at the end of the day you have to make up your own mind what settings you wish to use. If you are new to all this, then I would seriously recommend you to read Paul J’s “how to” document, which contains some very useful — and current! — guidance. Also, for what it’s worth, here are my own settings (this week....).
 |
Antialiasing
There is one topic in particular that I ought to discuss concerning Inspector settings before I leave you to your own devices with them, and that concerns Antialiasing. This area has caused a fair amount of confusion in the past, so it’s probably worth my summarising the essentials here.
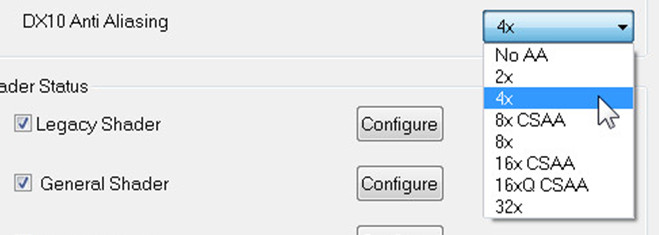
You should be aware that there is a required correlation between the AA which you set in the Fixer and your settings in the Inspector — but there is nothing to enforce this, you just need to know about it, and to get it right. Here is a table that suggests which Fixer settings are associated with the AA Transparency Supersampling settings (2x, 4x, and 8x) in the Inspector:
| Fixer setting | Inspector setting |
| 2x | 2xSGSS |
| 4x or 8x CSAA or 16x CSA | 4xSGSS |
| 8x or 16xQ CSAA or 32x | 8xSGSS |
So in my own case, from the range of options in the Fixer I
stipulated:
Whilst in the Inspector I correspondingly set:
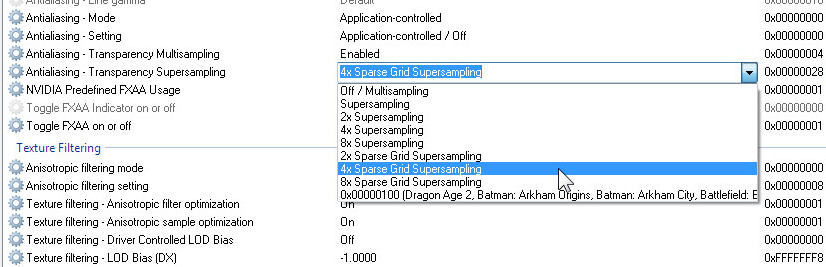
Your settings may be different, of course, depending on your
CPU-power and GPU-power, but simply make sure that your settings
conform to the relationships in the table above, and you’ll be
fine.
Finally, do please make sure that on the graphics page of your
FSX settings that you have it set up like this for DX10:
 |
In other words, both Anisotropic selected from the dropdown and also the tick in the Anti-aliasing box are needed. |
Hopefully, that should sort out your antialiasing (since it works differently in DX10. Naturally).
Mode switching: DX9 <----> DX10
As I mentioned, your DX10 Controller enables you to switch between DX10 and DX9 modes, literally with a mouse click. Well, that’s almost true….
Don’t forget that the Fixer will make changes to your fsx.cfg, as well. Now if there’s one thing that makes me very twitchy, it’s when external apps make changes to my fsx.cfg file without my knowing exactly what’s going on. I have weeks of my life invested in that file. So as well as the real file called fsx.cfg that fsx will use, I also keep copies of the two current versions — those that are correct for DX9 and DX10 — and manually (well, in actual fact I have little batch files that do it for me) copy the correct one across to the actual fsx.cfg file, just to be absolutely sure. Whenever there is a change to my fsx.cfg, I also take great care to save it to the backup version of the appropriate mode.
For example, when I had implemented DX10, the first thing that I did was make a copy of the altered file in its DX10 manifestation, so that I can be sure to return to it whenever I want to. If you regard that as overkill, well good luck and no hard feelings. (But it works for me).
Incidentally, one example of a change that may come as a surprise to you is that in DX10 mode FSX uses a different DISPLAY.Device entry to DX9. So here is a small section of my DX10 version of fsx.cfg (I always add lots of comments like this, it’s my equivalent of talking to myself, I suppose):
//
// Note that the next line ends with .0 - so it's the DX9 version
[DISPLAY.Device.NVIDIA GeForce GTX 670.0]
Mode=5760x1200x32
Anisotropic=1
//
// Note that this Display Device line ends with .0.0 - so it's the DX10 version
[DISPLAY.Device.NVIDIA GeForce GTX 670.0.0]
Mode=5760x1200x32
Anisotropic=1
AntiAlias=1
//
So when switching modes, you may also wish to take care of your own housekeeping of the fsx.cfg stuff. And similar considerations also apply to the Inspector settings, of course. Happily, in this case there are icons for Import and Export, so it’s very easy to save and restore specific settings (don’t forget to Apply the changes before you exit the Inspector, though, just to be sure).

After installing the Fixer....
Go and fly, naturally! Be sure to load a VAS monitor so that you can see the improvement there, and also watch your frames per second figure. With any luck at all you will find that things have improved so much that you now need to re-tune your FSX installation to take advantage of the new headroom available. Whether you choose to go for increased fps or more high quality eye-candy is entirely up to you, but I reckon that’s the kind of problem that it’s good to have.
I mentioned above that if you installed any mods such as Shade or SweetFX then you need to have followed the most recent advice you can find, so if there are any post-install actions needed, then now’s the time to do them. You’re verging on the realm of the experimental to have such things, of course, so the need for recent advice is paramount: you may also find some helpful applicable advice in Paul J.’s ‘How To’ document (see “Internet sources of information”, above, for the link).
Talking of shades, one of Steve’s many great Fixer fixes relates to VC shadows. In the pic below start with the shadow from the Gear lever, and then look around the rest of the panel — amazing stuff.
 |
You may also discover that you now need to apply one or two updates to your scenery. I find that one of the things that puts people off DX10 derives from the fact that the overwhelming majority of stuff returned by a search engine is way out of date, and in very many cases no longer applies. For example, we all know that FlyTampa scenery doesn’t work in DX10, right? No — wrong, in fact. Visit http://www.flytampa.org/downloads.html
(Orbx is a particular case in point. On October 29th, 2013, John Venema made a statement about DX10. In it he stated: “We are committed to DX10 compliance for all our products”, adding “We are also aware of DX10 shadow issues for many objects in the Orbxlibs; again, we are acutely aware of these and are internally organising a disciplined, structured way to test and report on these DX10/DX11 issues and resolve them.” Well said, John, and thank you).
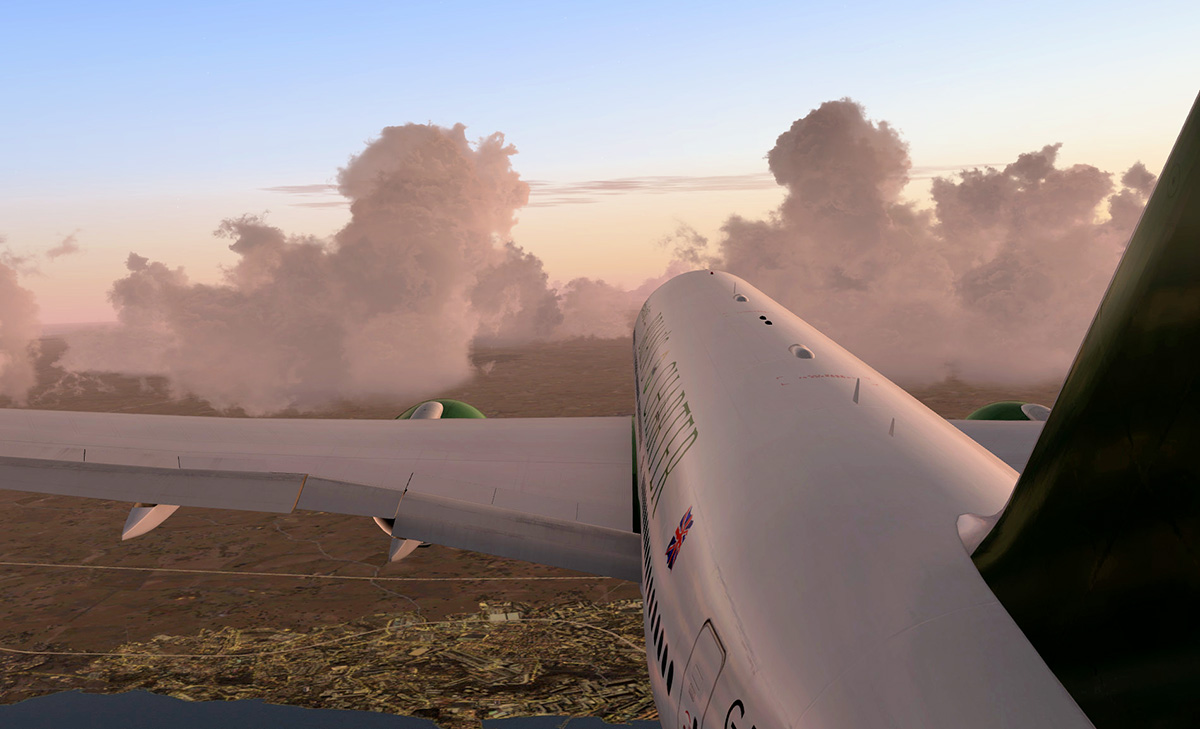
So, also from Orbx (FTXG + Vector), here is a shot showing the dusk street lighting in DX10:
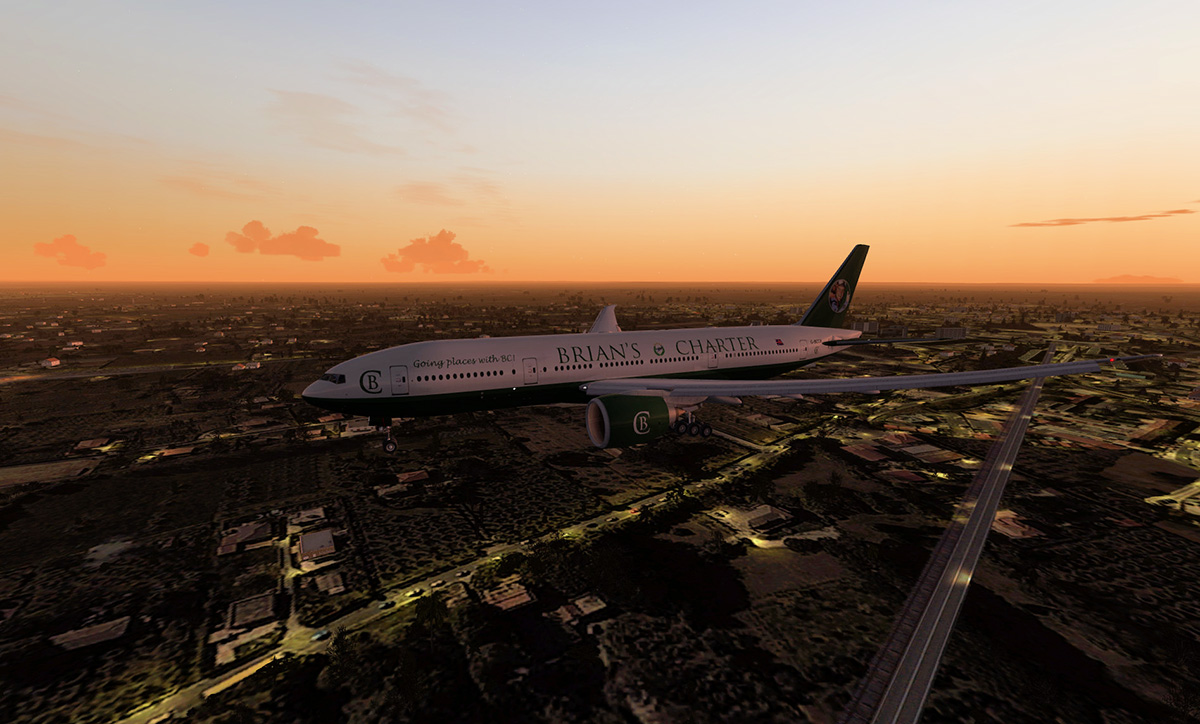 |
To summarise the above, after you’ve installed the Fixer and switched to DX10 mode there will be some work to tweak your settings. However (and this sentence is the review that I said was buried in here somewhere, so congratulations for finding it) all I can say is that I have never been so happy with the performance and the appearance of my FSX as is the case now, thanks to the Fixer.
But before I embark upon the summary and marking section, there is just one outstanding area that I promised you that I would cover:—
Reinstalling the Fixer
Why reinstall it? Well, one of the features which gives the Fixer the slight air of being more of a tool for propeller-heads than a utility for the average simmer is the fact that there is no facility for knowing when a new version is available, other than by checking the pinned item near the top of http://forum.avsim.net/forum/644-the-official-dx10-scenery-fixer-support-forum/
But when you do discover that a new version has been released and decide to install it, there is no easy-peasy in-place online update process. Instead, you have to go to your account at the FlightSim Store, download the new version, go into your Fixer’s DX10 Controller, revert to DX9, uninstall your old version of the Fixer, install the new one, configure it, and switch back to DX10 mode again. A bit clunky, to put it as kindly as possible.
So here is the reinstall process. What follows is pretty much as set out in http://stevesfsxanalysis.wordpress.com/2013/11/05/updating-to-version-1-1/
1 .Download the latest build from the FSS store...go to "My Account".
2. Double and Triple Check that your current version really is installed in a sub directory of Program Files (as it should be). If not, see the note
at the end.
3: Open your current version of the Fixer and select "uninstall libraries" — if you run FSX using multiple user accounts please follow the
instructions in the manual!
4: Go to the Windows Control Panel’s ‘Uninstall a program’ screen: select 'SteveFX DX10 Scenery Fixer' and uninstall it.
5: Reboot your computer.
6: Select the latest version of the installer (i.e. the you just downloaded, usually) and "Run as Admin".
7. Enter your license details if prompted. (Order Number, Order Date, and Registration Key)
(Elect to repair the Microsoft Visual C++ 2010 x86 Redistributable, if the window appears).
8. Do not close the wide splash window, it will close itself.
9. Reboot your computer again.
10. Right click the Fixer icon that should be residing on your desktop, and select Properties, then click the Compatibility tab and check that
the box "Run this program as an administrator" is checked (and if not, check it). [I added this step, since I think it’s worth doing].
11. Run the Fixer and set the fsx path, then reinstall the libraries (wait until complete, then click OK); then check your other configuration
options.
12. Run FSX and make sure that all is well.
NOTE — IF you originally installed DX10SceneryFixer into your FSX directory, then do NOT UNINSTALL (there used to be a bug that wiped your
fsx directory in such a case). Start at Step 6, above, and install the new version into the default location.
Summary
In case it hasn’t become obvious by now, I’m hooked on the Fixer. Certainly, when it comes to bang per buck, the Fixer scores top marks — in terms of potentially improving the FSX experience for the price paid, it has had no equal, in my decades of simming experience. FSX scenery when seen on my Ultrasharp monitors using LOD_RADIUS 7.5 at 5760 x 1200 x 32 is now indeed a thing of beauty.
There are minor operational criticisms, though. Steve is very clearly a techie, and hence he finds it hard to see things from the perspective of an “average” simmer who has just bought the Fixer and is a bit hazy what a texture is, or where his fsx.cfg file is to be found, and is put off when he can’t find the instructions for installing it.
I do therefore have a feeling that he would sell more copies if he spent some time putting in an easy-to-use online updater, and in general making the utility a little more simmer-friendly. I would also suggest adding some additional explanations to the manual, as well as improving the access to it prior to installation. I suspect that many people would be prepared to pay a bit more in order to receive some additional comfort in such a technical area.
But Steve’s achievement in bringing a largely-working version of DX10 within the reach of everyone (well, anyone who is a little bit technical and FSX-savvy, or has a friend who is) is huge, and he is to be warmly commended for that. As we all know, tuning and configuring FSX is not, and will never be, a straightforward business, so the way in which Steve has provided a GUI interface to implement the clever stuff which he has discovered is most impressive.
DX10 rocks — thank you, Steve!
Offline version
![]() Steve’s
DX10 Fixer.zip 2.66Mb
Steve’s
DX10 Fixer.zip 2.66Mb
![]()
Ease of Use: 9.4 out of 10
I struggled a little when marking this category, since arguably at present no one is going to buy the Fixer who is not sufficiently technically qualified to use it, and hence on that basis it’s bound to be easy to use for those who do buy it. The mark given reflects my feeling that more could (and arguably, should) be done to increase the Fixer’s appeal to the less-technical simmer, whilst at the same time I am rewarding the extent to which a GUI interface has been provided for the complex manipulations which are being carried out to achieve the Fixer’s effects.
Features: 9.9 out of 10
If you ever tried to run the DX10 “preview” (as supplied with FSX) on its own, then you too will be able to appreciate the huge amount of work that Steve has put in to overcome the many defects that were present “out of the box”. His work over a considerable period, not to mention the fact that for a long time he gave his various fixes away free, entitles him to excellent marks here.
Documentation: 8.5 out of 10
Whilst being…. perhaps a little more oriented towards techies, as it stands, the manual would benefit from some improvement. Having once spent years as the Editor of a technical magazine whose content was written largely by techies I can very much sympathise with the author, but nonetheless I would like to see more simmers able to take advantage of DX10, so that I do feel that the existing manual needs some additional amplification and clarification to help the less-technically-experienced simmers to be able to access the technology. (It would be nice to make some installation instructions available along with the original installation exe file, too).
Performance: 9.9 out of 10
In the context of most utilities, this category refers to how well it achieves what it sets out to do. The Fixer has made enormous progress since it replaced Steve’s original free fixes, and seeing the results of the paid version have also motivated me to want to vly more, since the freedom from worries about possible VAS depletion, combined with the increased gorgeousness of the scenery, have increased my FSX pleasure significantly.
Value for money: 10 out of 10
As mentioned above, this product is very modestly priced for the results which it achieves. It would be hyperbole to claim that it gives you a whole new sim, yet nonetheless the results can be, and in my own case certainly were, impressive. Whilst it’s probably true that more could be done to give some assistance to those whose knowledge of Virtual Address Space, Shaders, Inspector parameters, Buffer Pools, and the rest is somewhat scanty, that in no way detracts from the fact that Steve’s Fixer enables many simmers to achieve better results from their FSX than they would ever have been able to achieve on their own. A great utility for those willing and able to make the effort to take advantage of it!
 |
|
Mutley’s Hangar score of 9.5/10, "Outstanding" and a Mutley's Hangar
Gold Award. |
Post scriptum — two additional notes:
1. During the week or so since this review was written, a new version of the Fixer has been made available: v1.4, build 35.
2. May I in closing reiterate that the Fixer is not for everyone. It certainly worked for me, but whether it will work for you depends on your
simulation environment (hardware and software) and your experience level. Most especially it isn't for you if you are unwilling to spend time
tuning its many fixes for your installation and to your liking, and following the latest advice from illuminati such as Paul J. and of course
Steve himself whilst also disregarding outdated advice which is no longer applicable. (Search engines are not your friend in this scenario
unless you place very recent limits upon the date of the material they return). Also, if you do by any chance utilise any seriously old scenery
or aircraft which use the BGL format from Flight Simulator 8, then your problems may be hard to solve.
But you must excuse me now — I'm just off for another flight....
Brian Cowell
Review machine Spec: Intel i5 760 O/C 4GHz |
16GB DDR3 RAM |NVidia GTX670 FTW GFX Card |Windows 7/64