Saitek's Pro Flight range has appealed to many Flight Simmers
alike, for its ease of use, flexible compatibility and low
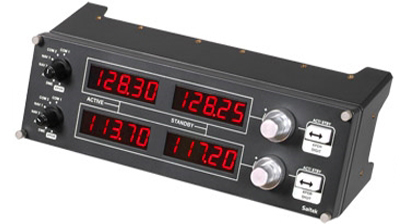
price. This review takes a look at the Saitek Pro Flight Radio
Panel, a member of the Pro Flight range, which sets out to
provide a realistic hardware copy of General Aviation type
aircraft radios (although I have used my Radios for my Boeing
747-400 Pedestal Project, which is an Airliner type aircraft).
The basics
The Saitek Pro Flight Panel costs (new), around £120. I was very
lucky, and managed to pick up two Saitek Radios which were brand
new for only £69 each in a Christmas Sale. To purchase, you can
buy from most retailers such as Just-Flight, Flight-Store, etc,
or you can have a root around on Ebay if you wish. Saitek also
have their official hardware retailer “GameShark”, which can of
course be used to purchase the Radio Panel too.
What it offers
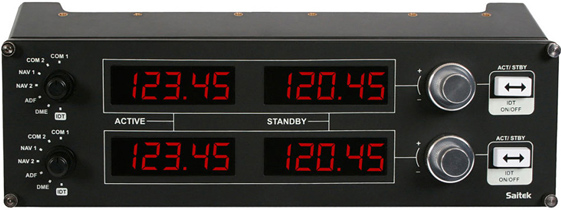
Each panel offers two radios per purchase, which are merged
together into one neat compact device. Each panel consists of
four 7-segment digital displays, two whole number and decimal
combined rotary knobs, two frequency switcher buttons, and
finally two other knobs which can be used to alternate the
functions of the panel.
The radio panel provides the functions of COM1/2, NAV1/2, ADF,
DME, and Transponder. As previously mentioned you can select
what function you wish to use by using the two function selector
knobs located to the left of the panel.
Finally, the Saitek Pro Flight Radios offer very comfortable
compatibility with most FSX add-ons.
What's in the box?
Out of the box, you will get a Radio Panel complete with USB
interface cable, some documentation, a Pro Flight installation
CD, a frame to mount your panel onto, and some Allen
keys/screws.
That's about it really. Everything you need to get started is
contained pretty much within the box, and anything else require
is carefully mentioned somewhere or another, whether that be in
the documentation or the supplied CD.
Using it with FSX
Once successfully installed, you can freely test the panels
functions with Saitek's free-ware Pro Flight testing
application. However, what most Simmers will obviously want to
do is jump into FSX and see how it handles.
Make sure the Panel's USB cable is plugged in, check everything
is OK and then hit the Fly Now button within FSX. Immediately,
the Radio Panels will display the appropriate frequency/number
that it needs to.
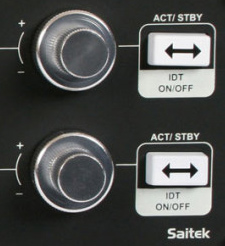
You can adjust what each panel displays by using the two
adjustment knobs located on the right of the panel. With these,
you have ultimate control over all frequencies, transponder
codes, and DME/ADF frequencies.
| Unfortunately, there is a downside to these selector knobs.
Whilst they are realistic and will change the numbers on the
Panel as you want them to, they may do so in unusual increments.
I found that I had to spend a few seconds longer each time whenever I changed frequencies getting it exactly right, as the selector knobs would skip numbers. For example, when using the Radio functions, the Panel, instead of moving in a linear sequence, would often jump ahead or behind the frequency I wanted. They would move something like, for example: 123.75, 123.77, 123.80. 123.87, 123.95... As you can see, it doesn't move up by an equal amount each time. |
 |
I found the Panel to be compatible with all the default
Aircraft, all of my add-on Aircraft (that is the Carenado
Seneca, 757 Captain, SimCheck A300, even the Aerosoft Discus
Gliders which have unusual avionics in the fact that they are
professional gliding aircraft, and not regular GA aircraft).
If you are flying an aircraft without, for example, a
transponder, and you told the Radio Panel to act as the
transponder, you would essentially end up with a defunct useless
display. However, this really doesn't matter at all (in fact it
is absolutely correct), as it is similar to someone trying to
drink out of an empty glass, and expecting their thirst to be
quenched.
In my home cockpit set-up, I have two Saitek Radios working in
tandem with each other, providing the essential functions of
COM1/2, and NAV1/2. This pretty much mean that I never adjust
the functions on each panel, but when I first received the
panels I had to set them to their appropriate functions. This
mean using the function knobs on the left.
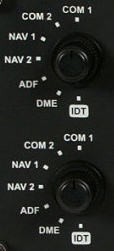 |
I cannot, for the life of me, understand this. The function
knobs on the left are so incredibly tight, that you will almost
certainly get blisters trying to turn them. They have even earned themselves a little nickname in the FS community, the Saitek “Gorilla Knobs”. I could maybe understand that Saitek want the knobs to stay firmly in place, but the difficulty of turning the knobs on the left is ridiculous. The 7-segment digital displays featured on the Radio Panels are great. They are crisp, easy to read and as far as I can see are completely problem free. They have absolutely no lag when changing numbers (ie they move EXACTLY in time with FSX), so that's another plus for Saitek. |
Another feature that really impresses me is the two way
input/output interfacing with the Simulator. What I mean by this
is, is the fact that whilst you can obviously change frequencies
on the Radio Panel, you can also change them in the Simulator
itself, and the Panel will react accordingly. Say you are tuned
to frequency 123.75, and you change to frequency 125.23 through
mouse-clicking in FSX, the Radio Panel will magically change
frequencies without you even touching it. There are a number of
ways this benefits the Simmer, too many to list in this review,
but a few examples are “automatically” changing frequencies (ie
with something like FS2Crew), changing frequencies with the
internal FSX ATC window, and many others.
Mounting
Since I am actively building a Simulative rendition of a Boeing
747-400 Pedestal, which obviously requires avionics to be
“mounted in” to the Pedestal, I thought I'd add some thoughts on
how the Radio Panels can be Mounted in an additional section.
This is also important for all Simmers, as some may wish to
simply place the Radio Panel on their desk, whilst others will
want to maybe put it into a wooden frame.
In my review of Saitek's Pro Flight Switch Panel, I said that
there was a lack of Mounting options for that particular panel.
Conversely, Saitek have treated us with the Radio Panels,
providing a whole bunch of mounting options straight 'outta the
box.
You can, if you wish, simple place the Radio Panel flat down and
use it at your discretion However, if you wish to actually stand
the panel up, Saitek have given us a wonderful frame for use
with your home-cockpit set-up.
This frame can be freely attached and taken off with ease. I
used this frame actively before Mounting my Radio Panels in my
Pedestal set-up. Even then,without the frame, the Radio Panels
have a nice little ledge which can easily be screwed down onto
something (Saitek have even provided screw holes for you to do
this!), again another bonus with this piece of hardware.
Compatibility with FS2004
Now, whilst I cannot vouch for this since I don't have FS2004
installed, the Radio Panel does seem to be FS2004 compatible
natively. Again, this is an improvement over the switch panel,
in which users had to make their own special interfacing
software to get the switch panel functioning in FS2004.
I am pleased to see that Saitek have not deserted FS2004
customers. Since less and less developers (weather that be
software or hardware) are steering away from FS2004, it's good
to see that Saitek are still supporting the older Sim.
What amazes me is, whilst this obviously isn't a native
compatibility, some people have even managed to get the Radio
Panel working with the X-Plane Sim. This shows to me that the
Radio Panel is very flexible in terms of interfacing, so god
only knows what the limits of the Radio Panel are.
Value for money
In this tough economic climate, cost is always an important
factor in most decisions. The Radio Panel from what I can see
does offer good value for money, beating out competition in
terms of price by a long way (not only is it a lower price, but
you get two radios per panel!).
As previously mentioned, if you have a good look around I
suppose you could get an incredible deal. I am very pleased with
my two radio panels, which were almost a buy-one-get-one-free
purchase!
Conclusion
To summarize, I'd like to say that the Radio Panel offers a
culmination of great value, universal flexibility (interfacing),
great compatibility with add-ons, nice looks and realistic feel.
It is a great piece of kit which I have absolutely no regrets in
purchasing.
It is only let down by the strange gorilla knobs on the left,
and the occasionally jumpy frequency select knobs on the right.
![]() Verdict
Verdict
What I liked:
-
Good value for money
-
Easy usability
-
Nice, crisp 7-segment digital display
-
Very reliable
-
Fantastic compatibility (FS2004 support!)
What I didn't like:
-
Those gorilla knobs.
-
Jumpy frequency select knobs
Overall,I would
award this a very creditable Mutley's Hangar score of
9/10
![]()
/Jack Whaley-Baldwin
 |
System Requirements
|
|
|
|